| |
I
use my seam ripper as a stiletto. It's handy when you need to
hold down an edge.
|
| |
|
| |
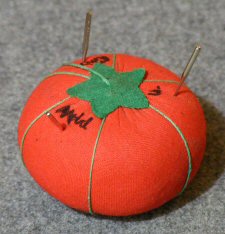
To
keep your different sized sewing machine needles organized and
at easy reach, try labeling a tomato pin cushion using a fabric
marker, keeping each needle in the marked section of the cushion
.........Submitted by Amber
|
| |
|
| |
I
find that pipe cleaners are the absolute best for fishing dust
bunnies out of my sewing machine. They seem to be magnetic and
the best part is they go around corners!.......Submitted by
Penny |
| |
|
| |
I'm
now using the small roller that came in a wallpaper kit for 'finger
pressing', instead of the little wooden tool.............Submitted
by Karen |
| |
|
| |
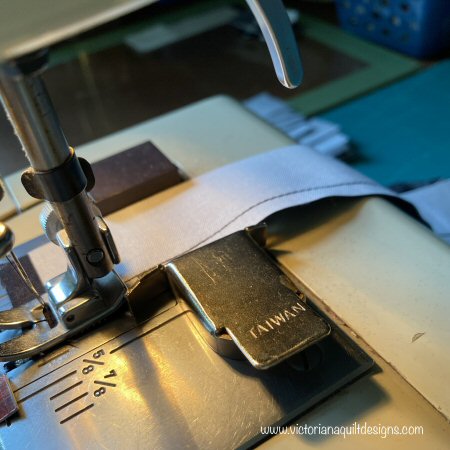
To
help my strip piecing, I prefer shorter strips, because long strips
tend to go wonky/wavy.
Plus, to keep them straight, as I'm stitching, I add magnets -
as stitch guides the strip can flow through, behind the presser
foot.
|
| |
|
| |
If
you have trouble threading the needle of your sewing machine,
holding a white piece of paper behind makes it easier.......Submitted
by Cordelia |
| |
|
| |
I
keep an old used/empty tissue box by my sewing machine to drop
thread scraps and fabric trims in.
The plastic film keeps them in the box and not floating around
my projects......Submitted by Marci |
| |
|
| |
I
glued anti slip material to the bottom of my sewing machine pedal,
which keeps it from slipping!...............Submitted
by Ellen |
| |
|
| |
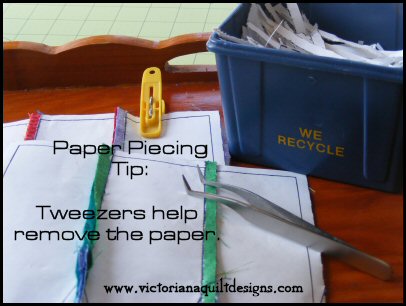
Paper
Piecing Tip: Tweezers help remove the paper. If you can
find these pointy kind (medical supply) they work great for getting
into those tiny angles and popping out the paper!

|
| |
|
| |
To
use larger spools of thread, add an empty pen case or straw to
extend the spool pin.

|
| |
|
| |
My
Tip for Using Your Seam Ripper:
I
learnt how to sew, by making clothing - beginning with doll clothes,
and eventually making my own.
The way I was taught to use the seam ripper, was exactly the same
- from my home ec teacher and even in the tailor shop, where I
worked summer & weekends for a few years -
Cut the thread with the ripper, pull a few stitches and start
pulling the thread out until it breaks...take the backside thread
and pull it until it breaks, and so on. This crinkles the fabric,
stressing it, and can do some damage to your fingers as you pull.
Perhaps
this is okay for clothing, but with small patches for quilts,
there's a better way, that doesn't pull at the fabric at all.
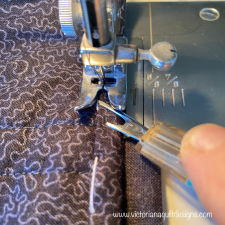
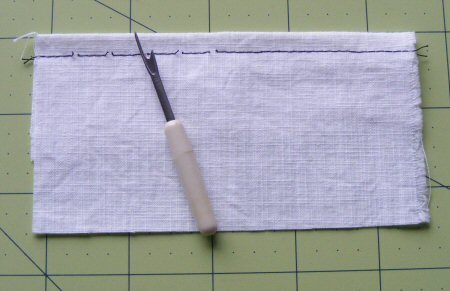
I
stitched this sample to show you how.
I wouldn't normally stitch black thread on white, but did, so
you could easily see this.
With
the ripper, cut the threads every 3 to 4 stitches, all the way
along the seam needing to be removed.
When complete, pull the thread on the back, which will easily
pull out as a whole.
There will be little threads that need cleaning up, but this goes
quickly - picking them up with your fingers, or you could use
a lint brush/roller - if you have one. |
| |
|
| |
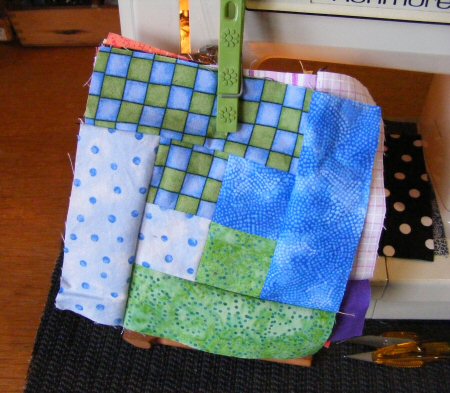
When
machine sewing I like to use an easy stitching project as my anchor
cloth.
This is a stack of them, held by a clothes pin, waiting to be
pressed.
On the Glossary
page of my site I describe an 'Anchor
Cloth' as: A scrap piece of fabric sewn through, before and
after chain piecing.
It anchors the threads and prevents the machine from eating up
the edges of your fabric.
Sewing over a scrap is a great idea and saves you from the 'beginning'
problems that can happen when you start sewing.
Even better is to have an ongoing project (like my Loving
Our Earth Tiny Scrap String Project), which you sew, instead
of the scrap fabric.
You cut/prepare the patches in advance, and keep them by your
machine to use each time you sew.
That way, eventually, you have a bonus quilt put together.
Since I've
started collecting fabrics I have cut a strip off of each and
sewn them into these blocks.
I now have one finished double sided quilt and enough blocks to
do another.
And I love the way I am able to adore bits of each of my fabrics
by looking at this quilt
[This pattern is available on the site as my Charm
Quilt.]
|
| |
|
| |
I attached
a long ribbon to a small pair of scissors and tied it to the handle
of my sewing machine cabinet. Now when I have to snip those threads
or do a little cutting I have a pair of scissors handy. No more
scissors that always walk away.............Submitted by Laurie |
| |
|
| |
The
holder of a stack of CD's or DVD's can be repurposed as a large
spool holder, beside your sewing machine.........Submitted
by Karen |
| |
|
| |
I
never liked the idea of changing my sewing machine needle with
every project. Instead I sharpen them by sewing (without thread)
through a piece of fine sandpaper. It gives me a fresh needle
everytime........Submitted by Anne |
| |
|
| |
When
you set up a new stitch on your machine that you think you might
want to use again, stitch a sample of it on a square piece of
plain fabric. Be sure to mark the stitch settings & other
details in fabric pen below the stitch.
You can stitch these swatches into a small book.......Submitted
by Kim |
| |
|
| |
Use
the white pages of an old telephone book as foundation paper for
string pieced blocks.......Submitted by Karen |
| |
|
| |
I
like to reuse the plastic tube from miniature M&M's as a travel
bobbin holder......Submitted by Carrie |
| |
|
| |
A
good substitute stabilizer for machine applique or embroidery,
in a pinch, are round paper coffee filters........Submitted
by Tina |
| |
|
| |
Before
I embroider a design for the first time, I sew it on a scrap of
fabric so if it doesn't work well I haven't ruined the garment.
These test squares I use to make pillows, a lap quilt, a pot holder
or hot pad for casseroles for church sales or other charity events.......Submitted
by Sandy |
| |
|
| |
I
put a piece of sticky back velcro on the bottom of my machine
foot pedal, sticks on the carpet so I'm not chasing it all over.......Submitted
by Carmen |
| |
|
| |
When
I do paper piecing I only print one copy of the pattern. I then
take pattern to sewing machine and a stack of paper (8 to 10)
and sew the lines without thread (using an old needle and regular
stitch length). This gives me copies with double the holes to
tear off, making it easier.......Submitted by Dolly |
| |
|
| |
I
have a great tip for paper piecing. Pre folding all of the lines
before sewing a block makes it very quick to line up your pieces
and you use less fabric. It also tears off easier when removing
it later.......Submitted by Carol |
| |
|
| |
To help
you sew sew a straight line get some tape from the hardware store
that is about 1/16" thick. Cut 3 or 4 pieces about 4"
long and put them on top of each other. Place on your sewing machine
at the ¼" mark and glide your fabric
against it as you sew.......Submitted by Joyce |
| |
|
| |
When
chain sewing anything, especially half square triangles, take
an old plastic thread spool and put a small seam ripper into the
middle hole with the point facing up. This allows you to use both
hands to quickly seperate the pieces. Works great and is nice
to finally put that old seam ripper that came with your sewing
machine to good use!......Submitted by Stephanie |
| |
|
 |
Masking
tape helps when "unsewing". Tape a piece over the seam
that needs removing, and has been clipped every few threads. Lift
carefully off and all the little thread pieces come with it......Submitted
by Gail |
| |
|
|
I
prefer to use a wooden skewer than a metal stiletto. This way
I won't break a needle or knock my machine out of time if I hit
it.........Submitted by Pat |
| |
|
|
Use
half of a wooden clothespin for finger pressing your seams. You
can decorate them and gift them to quilting friends..........Submitted
by Francis |
| |
|
|
Old
phone books work well as the base for string quilts. They remove
from the finished block much easier than old flyers or mailers.........Submitted
by Diane |
| |
|
|
To
keep the sewing machine foot peddle from slipping, place it on
a mouse pad ....... Submitted by Jeanine |
| |
|
|
For
a clearer view of your stitching, try using the small rubber door
stops under the back of your machine while sewing. They
tilt the machine just the right amount, and cost far less than
the expensive "tilt boards" that you can buy.
Plus, the rubber helps keep your machine from slipping around.
.....Submitted by Bonnie |
| |
|
|
If
your machine is not set up to handle the large cones of thread,
simply drop it into a largemouth canning jar and thread it to
your machine. Works great!....Submitted by Melissa |
| |
|
|
Here's
a way to make a similar quilt to your String Pieced Charity Quilt.
Use flannel or cotton batting as the foundation. Cut out the backing
a bit bigger than the size of block. Attach the fabric in the
same way you describe ( foundation piecing), then attach the blocks
together to form a quilt top. A backing is applied, and instead
of binding the quilt, sew the front and back together (each facing
the other) on 3 sides, flip it right-side out, then whipstitch
shut.
I've also heard them called "strippy quilts" and "popcorn
quilts" ('cuz you can't make just one!)...Submitted by Tanya
|
| |
|
|
If
you are paper piecing a block that is larger than letter size
paper, use a large sheet of tissue or wrapping paper...Submitted
by Marie |
| |
|
|
To
stop the foot pedal of your sewing machine from slipping, cut
a square of rubber shelf liner the size of the foot pedal and
place it under. |
| |
|