My
favorite method of piecing is by hand. Sometimes, with
practice, you can put together some complicated shapes
- such as curves, or insets - faster than going to the
bother of dragging out your sewing machine. You can
ease pieces together while stitching to ensure exact
sizing. And traveling with a small project in a little
bag, ready to whip out when sitting waiting for a train,
or in the passenger seat of a car, suddenly becomes
a boredom antidote. A quart ziplock bag containing some
ready cut pieces, thread, a needle and scissors - a
doctor's office is covered, no more reading out of date
magazines!
Many of my art quilts are stitched together by hand.
It's probably the most enjoyable part of quilting as
far as I am concerned.
How To Hand Piece
Tip:
Always make sure that all the pieces on the outside
edges of the block are cut on the straight of the grain.
If at all possible cut triangles so that a straight
grain meets a bias edge giving less chance of stretching
the piece while stitching.
Step
1
Lay out
all the pieces of your block exactly in the position
you want them stitched together. Pick out the first
two triangles to stitch. Hold the right sides together
with your fingers.
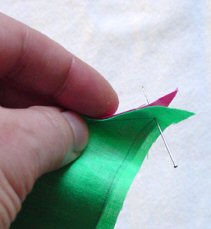
Start by
pinning the two pieces - push the pin straight through
at each point of the triangle where the pencil lines
meet. Do the same on the other point.
Leave the
pins at right angles to the fabric so it doesn't get
distorted. I like using Iris Swiss pins or fine glass
head pins as they are very skinny.
Step
2
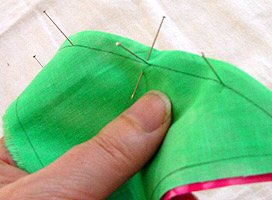
Pin in between
the points, leaving approximately one to one and a half
inch spaces.
All the
pins should now be at right angles to the fabric.
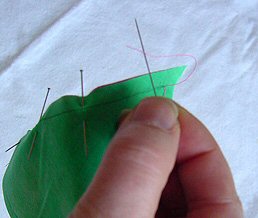
Take another
pin and line it up with the one already in the triangle
tip. Angling the pin almost horizontally push it down
and back up through the fabric. Because you have the
first pin already steadying the fabric the second one
will slide in without shifting the two pieces. Remove
the pin at right angles and use this to do the same
thing to the next pin. Keep on doing this until you
have all the pins properly lodged. This way you will
find the pencil marks will stay exactly lined up while
you stitch.
Step
3
Everyone
uses different needles for piecing. I use a straw/milliners
needle, some people use a 'sharp' and Jean Lyle recommends
using a size 10 appliqué needle.
Thread your
needle of choice with either 100% cotton or cotton covered
polyester (I like YLI Select hand piecing cotton thread).
Use a colour that matches the darker fabric or a neutral
shade such as medium gray. Do NOT make a knot
at the end of the thread, this makes extra bulk and
the less you have to quilt through later - the better!
Take one
tiny stitch into the first pinhole. Split the tail with
the needle, pull the thread through and tighten to lock
in the first stitch.
Step
4
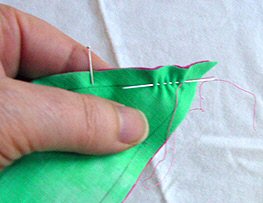
Back stitch
a couple of times and then take about five or six running
stitches onto the needle before pulling the thread through.
As you take each stitch, keep an eye on the two sides
to make sure you are stitching ON the pencilled
line.
I make my
stitches about one sixteenth of an inch apart. Some
fabrics are a little harder to stitch through, for example
pima cotton has a high thread count so it is harder
to push the needle through. Most normal quilter's cottons
are printed on lighter weight fabric with lower thread
count so are really easy to stitch through.
Step
5
Back stitch
approximately every inch and a half. This gives strength
to the seam and locks in the stitches. The idea behind
this back stitching is if ever the seams come apart
(heaven forbid) then the whole seam won't go. Just the
part between the back stitches.
The pins
are a good marker for when to back stitch. As you reach
each second pin then take it out and back stitch.
Don’t worry
about whether you are making an exact quarter of an
inch seam. You are stitching ON the pencil
lines so you are following the exact shape of the template.
If you want
to trim the seams even later, you can. You will find
when you iron the block flat it will be the size you
were aiming for.
Step
6
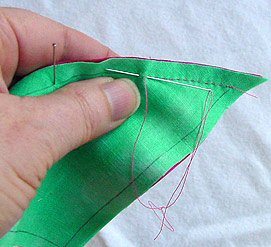
Near the
end of the line make two or three back stitches. At
the last stitch make a loop big enough to put the needle
through easily.
To secure
the thread, push the needle back through the loop and
then through the loop you just made. Tug the whole mess
gently to close it up and make a small knot.
Snip off
the thread leaving about half an inch tail.
Step
7

During the
piecing of little bits of fabric you start running into
seams. You may have noticed that ironing seams flat,
open or otherwise has not been mentioned so far and
there's a very good reason for this.
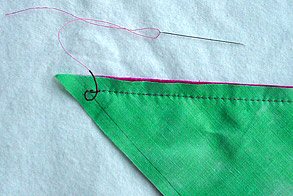
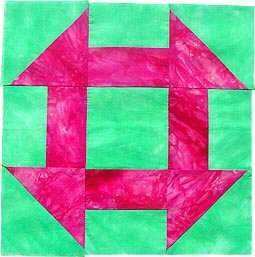
Using the
Hole in the Barn Door quilt block as an example, pin
and stitch a pair of rectangles to the centre square.
Make running stitches as usual right up to the seam.
Just before the seam take a backstitch, push the needle
through the seam and make a backstitch on the other
side.
Check to
make sure that the two stitches join exactly on the
other side to give a continuous seam and no little gaps.
Now you see why the seams are not ironed. They need
to be unfettered (!) so that you can negotiate which
way they will be ironed when the block is finished.
Step
8
Let's put
a Hole in the Barn Door quilt block together and see
what all this hard work can accomplish!
First stitch
all the pairs of triangles together being careful not
to stretch the seams. Then stitch all the rectangles
together. These pairings will make eight squares plus
you have the plain square for the middle of the block.
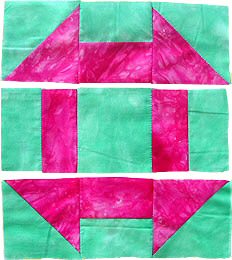
Piece the
middle row together first. Pin and stitch a pair of
rectangles to the centre square and then do the other
side.
Next piece
the top row together by pinning and stitching the two
paired triangles to either side of the paired rectangles.
Now you
should have three rows that look like the picture.
Step
9
Stitch the
three rows together and 'voila' - there's a beautiful
Hole in the Barn Door quilt block. Do that a few times,
stitch all the blocks together and make a whole quilt
top.
As I stitch
each piece together I finger press the seams over to
the darker fabric. Once the block is complete I iron
it properly and measure it making sure it is the size
I want.
Rose Rushbrooke
Rushbrooke
Strand
~~~
Thanks
Rose...Your tutorial explains hand piecing so clearly
and I love that you can hand sew any quilt block using
that method, the same as the first quilt blocks were
made!
Be sure
to visit Rose's site here.